When the patient visits the facility for an appointment, the provider would want to know about patient’s health information in the past. InSync facilitates the user to record patient’s history details in the system. This history can be useful for taking decisions at times for physicians. The patient history is also printed on the Encounter note.
Adding Patient History
You can record patient’s social, medical, psychiatric, family, and surgical history details in InSync. You can record patient’s history either from patient demographic section or from Facesheet when working with encounters.
To record patient history:
| 1. | From the left menu items, click Patient Search. |
| 2. | Click the  icon prior to the patient name and then click the History tab, or, icon prior to the patient name and then click the History tab, or, |
Click the Facesheet link next to the patient name, start or edit an encounter and click the History link.
| 3. | The Social History section opens upon the top. To enter any general notes related to history, click General Notes tab at the top. Once notes are added, click Save. |
| 4. | In the Social History section, |
| you can do the following to record Social History details: |
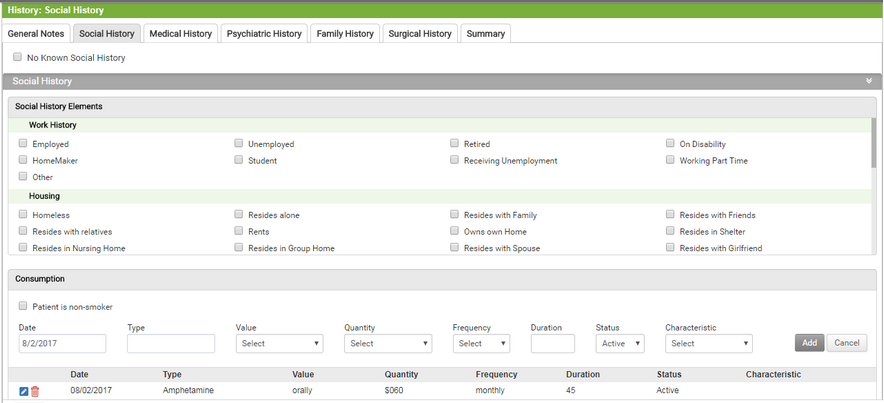
| • | On the Social History tab select the Social History elements. |
| • | Select the type of consumption (for example, Alcohol, Coffin Usage, and so forth) from the drop down list. |
| • | Select an appropriate value for the recorded consumption type. For example, tea, coffee, and so forth, if you have selected Beverage as the consumption type. |
| • | Select the quantity consumed by patient during the day, for example, 1-2 cups, 3-5 cups, and so forth. |
| • | Select the frequency of consumption, for example, 4 days a week, 20 days a month, and so forth. |
| • | Enter the duration since how long the item is being consumed. |
| • | Select an appropriate status and characteristic from the drop down list. |
Note: The options such as type, value, quantity, frequency, duration, and status of consumptions are configurable and can be discussed while Implementation process.
| • | To edit Consumption Type click on this  icon. icon. |
| • | To delete Consumption Type click on this  icon. icon. |
| • | Enter the social history notes in the free-form textbox, if any. |
| • | Enter the confidential notes in the free-form textbox, if any. Being confidential, these notes can be accessed only by the physician and will not be printed on the Encounter note. |
| • | Select the “Patient is non-smoker” check box if the patient does not have smoking habit. |
| 5. | In the Medical History section, |
you can do the following to record Medical History details:
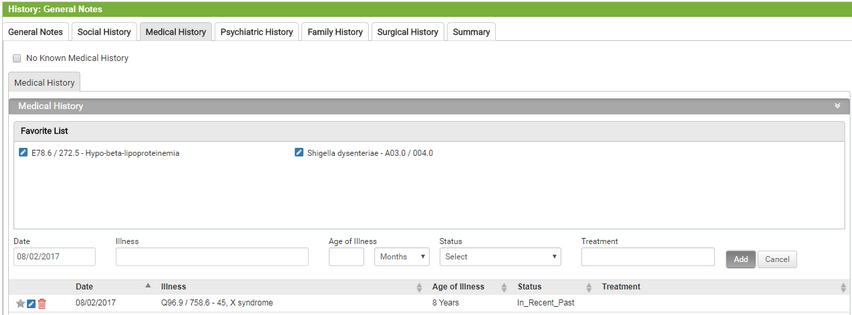
| • | On the medical history tab, you can edit and add illness to favorite list. |
| • | Start typing the illness and select using smart search results. |
| • | Select the status of that illness from the drop-down list. |
| • | Enter the treatment that patient has taken for that illness, if any, in 500 characters. |
| • | Click on Add to record the illness. |
| • | To edit illness click on this  icon. icon. |
| • | To delete illness click on this  icon. icon. |
| • | Enter the Medical History Notes in the free-form textbox, if any. |
| 6. | In the Psychiatric History section, |
you can do the following to record Psychiatric History details:
| • | Start typing the illness and select using smart search results. |
| • | Select the status of that illness from the drop-down list. |
| • | Enter the treatment that patient has taken for this illness, if any, in 500 characters. |
| • | Click on Add to record the illness. |
| • | To edit illness click on this  icon. icon. |
| • | To delete illness click on this  icon. icon. |
| • | Enter Psychiatric History Notes in the free-form textbox, if any. |
| 7. | In the Family History section, do the following: |
| you can do the following to record Family History details: |
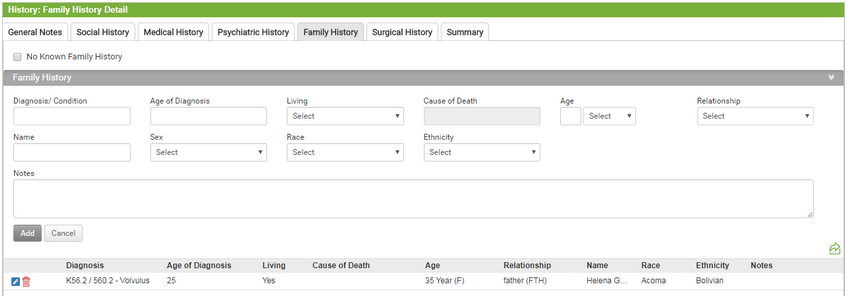
| • | Start typing the condition/Diagnosis from the drop-down list. |
| • | Enter the Age of Diagnosis. |
| • | Select the living status of the member from the drop down list. |
| • | Enter the age of the selected member. |
| • | Enter the cause of death if selected member is deceased. |
| • | Select the relationship from the drop-down list. |
| • | Enter name of the family member. |
| • | Select Sex, Race and Ethnicity. |
| • | Enter notes specific to the Condition/Diagnosis. |
| • | Enter the notes in the text Family History Notes box, if any. |
| • | Click on Add to record the family history. |
| • | To edit illness click on this  icon. icon. |
| • | To delete illness click on this  icon. icon. |
| • | The details you record will appear in the grid below. |
| • | Enter Family History Notes in the free-form textbox, if any. |
| 8. | In the Surgical History section, do the following: |

you can do the following to record Surgical History details:
| • | On the Surgical History tab, you can edit and add procedures to favorite list. |
| • | Enter the name of the surgery performed on the patient. |
| • | Enter the date on which the surgery was performed or select the date from the calendar icon. |
| • | Enter the facility name where the surgery was performed. |
| • | Enter the name of the provider who performed surgery. |
| • | Enter the outcome of the surgery. |
| • | Click on the Notes  icon to enter surgery related specific notes. icon to enter surgery related specific notes. |
| • | Click to this icon  to attach any document. to attach any document. |
| • | Click Add to record the surgical history. |
| • | Enter Family History Notes in the free-form textbox, if any. |
| 9. | In the Gynecological History section, |
| Note: The Gynecological History section is visible in the system only for female patients. |
you can do the following to record Gynecological History details:
Note: The Gynecological History section is visible in the system only for female patients.
Under Gynecological History Section:
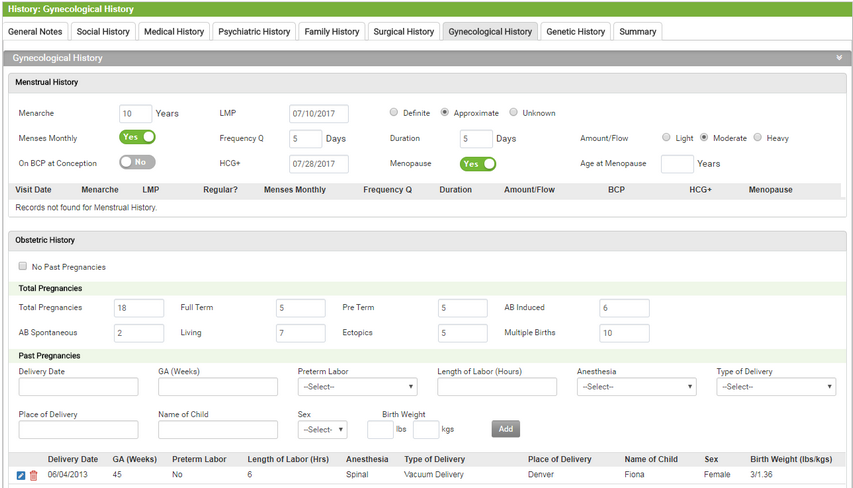
| • | Enter the Age of Menarche. |
| • | Enter the Last Menstrual Period. |
| • | Select the appropriate option(Definite, Approximate or Unknown) |
| • | Click on the switch(yes or No) to record details about monthly menses. |
| • | Select amount of flow(Light, Moderate or Heavy). |
| • | Click on the switch(yes or No) to record On BCP at conception Details. |
| • | Click on the switch(Yes or No) to indicate Menopause. |
Under Obstetrics section:
Record Total Pregnancy details:
| • | Enter the Total Pregnancies. |
| • | Enter Full term and Pre Term Information. |
| • | Enter AB Induced information. |
| • | Enter AB Spontaneous information. |
| • | Enter living information. |
| • | Enter Ectopics Information. |
| • | Enter details regarding Multiple Births. |
Record Past Pregnancies:
| • | Enter the Delivery Date. |
| • | Select Anesthesia given. |
| • | Select the Type of Delivery. |
| • | Select the Place of Delivery. |
| • | Enter the Name of the child. |
| • | Enter the child's Birth weight. |
| • | Enter Gynecological Notes in the free-form text box, if any. |
Note: The female patient should have at least one Antenatal follow-up visit recorded. On the Antenatal visit, if the records are entered in the Antepartum form, this tab will show the Obstetrics & Gynecological information recorded.
| 10. | In the Genetic History section, |
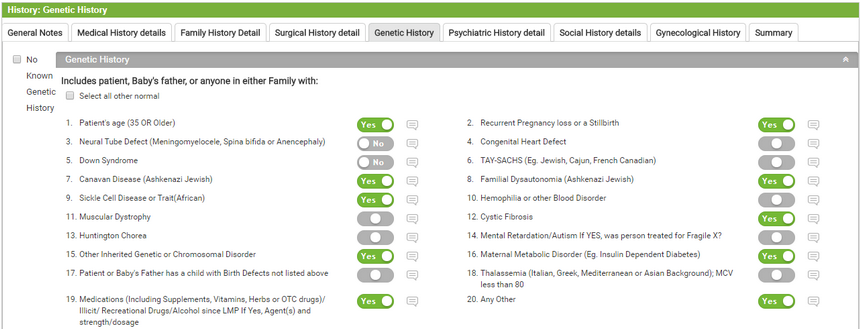
you can do the following to record Genetic History details:
| • | Enter the comments regarding Genetic history of the Patient. |
| • | Click on the “Select All Other Normal” check box to indicate all genetic records are normal else click on the yes button and enter the details regarding that Genetic History. |
| 11. | Click the Summary tab to view all the details recorded in the history elements above. |

